guest@monty.sh:/public/posts$ f="UART You Waiting For? Netboot That SBC!"; "date -r $f -u +"%Y-%m-%d" && cat $f
2025-01-03Recently, I was gifted a SiFive Vision2 SBC. It’s marketing is a bit opaque, but it seems to be marketed largely as a generic development platform with a focus on AI and Internet-of-Things applications. But, looking at its specs it seems to be a really serviceable single-board computer in general. Here’s the quick and dirty of it, if you don’t feel like reading the longer tech specs:
- Quad-Core RV64GC CPU @ 1.5GHz
- 8 GB LPDDR4 SDRAM
- IMG BXE-4-32 MC1 (Frustratingly lacking open documentation)
- Support for SD Card, eEMMC, and M.2 M-Key boot media.
- 1 HDMI, 4 USB, 2 Ethernet ports
- 40-pin GPIO
Given my reputation as the local RISC-V freak, the board really seems like the perfect gift - although take that with a grain of salt, since I’ve not actually put it through its paces yet. You’ll probably hear all about successes and frustrations with it in later posts.

A lot of my latest projects have focused on low-level RISC-V, so this board will be a great way to test my software; after all, if it doesn’t run on real hardware then I can’t really say it works, right? Of course, it’s cumbersome to test on hardware. Flash, boot, find an issue, fix, repeat. The process involves lots of pulling tiny cards in and out of little ports that are more or less obscured by the SOC’s acrylic case, and as much as I love retrocomputing I’m not particularly eager to waste a quarter of my development time reflashing the OS like it’s 2002.
My prior experience running a server rack in my closet told me there’s a better option. I already knew it was possible to boot a sever from an image over the network, and the SBC has not one, but two ethernet ports…
There’s just one problem: There’s no OS on the board! In fact, there’s no storage media attached whatsoever. No SD card, no USB, no eMMC or M.2 SSD. That means no drivers, and thus no video output or device input. Prior research informed me the bootloader likely wouldn’t include any of that “standard” I/O we’re all used to from our desktop and server PC experience, and a quick plug-and-test confirmed it. If I wanted to configure this board, I’d need to get more… direct.
Enter the humble but venerable NS16550 UART… or at least something compatible with the 16550 spec! This thing is industry standard and present on pretty much every single IBM compatible PC which of course includes your Intel/AMD processor, but is also present on almost any embedded device. It’s so robust that it’s used in the linux kernel to report information extremely early in the boot process, before any other I/O has been established — the entire driver I just linked there is only ~150 lines of C, a testament to how simple it really is.
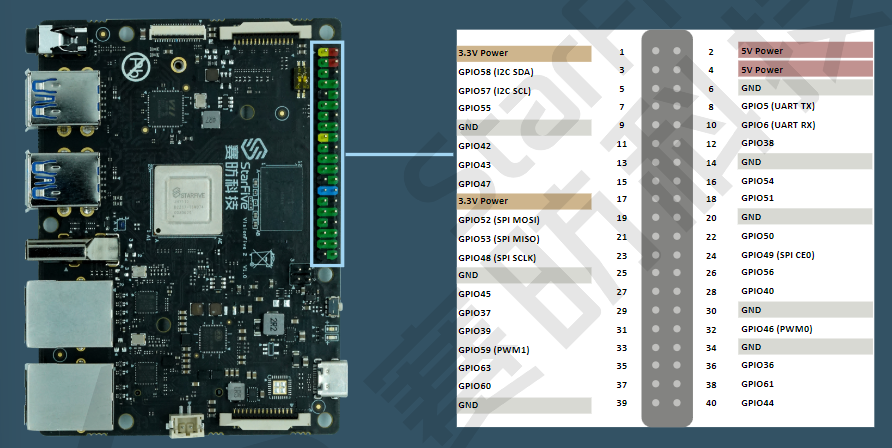
With how ubiquitous it is, there must be some sort of serial interface on the VisionFive2, right? Spoiler: there is, it’s one of the reasons the board was picked out for me. A quick trip to the GPIO User Guide gave me the following pinout:

Of note here are pins 8 and 10 on the right column: GPIO5 and 6, also
known as UART TX and RX! These are the pins to connect to the internal
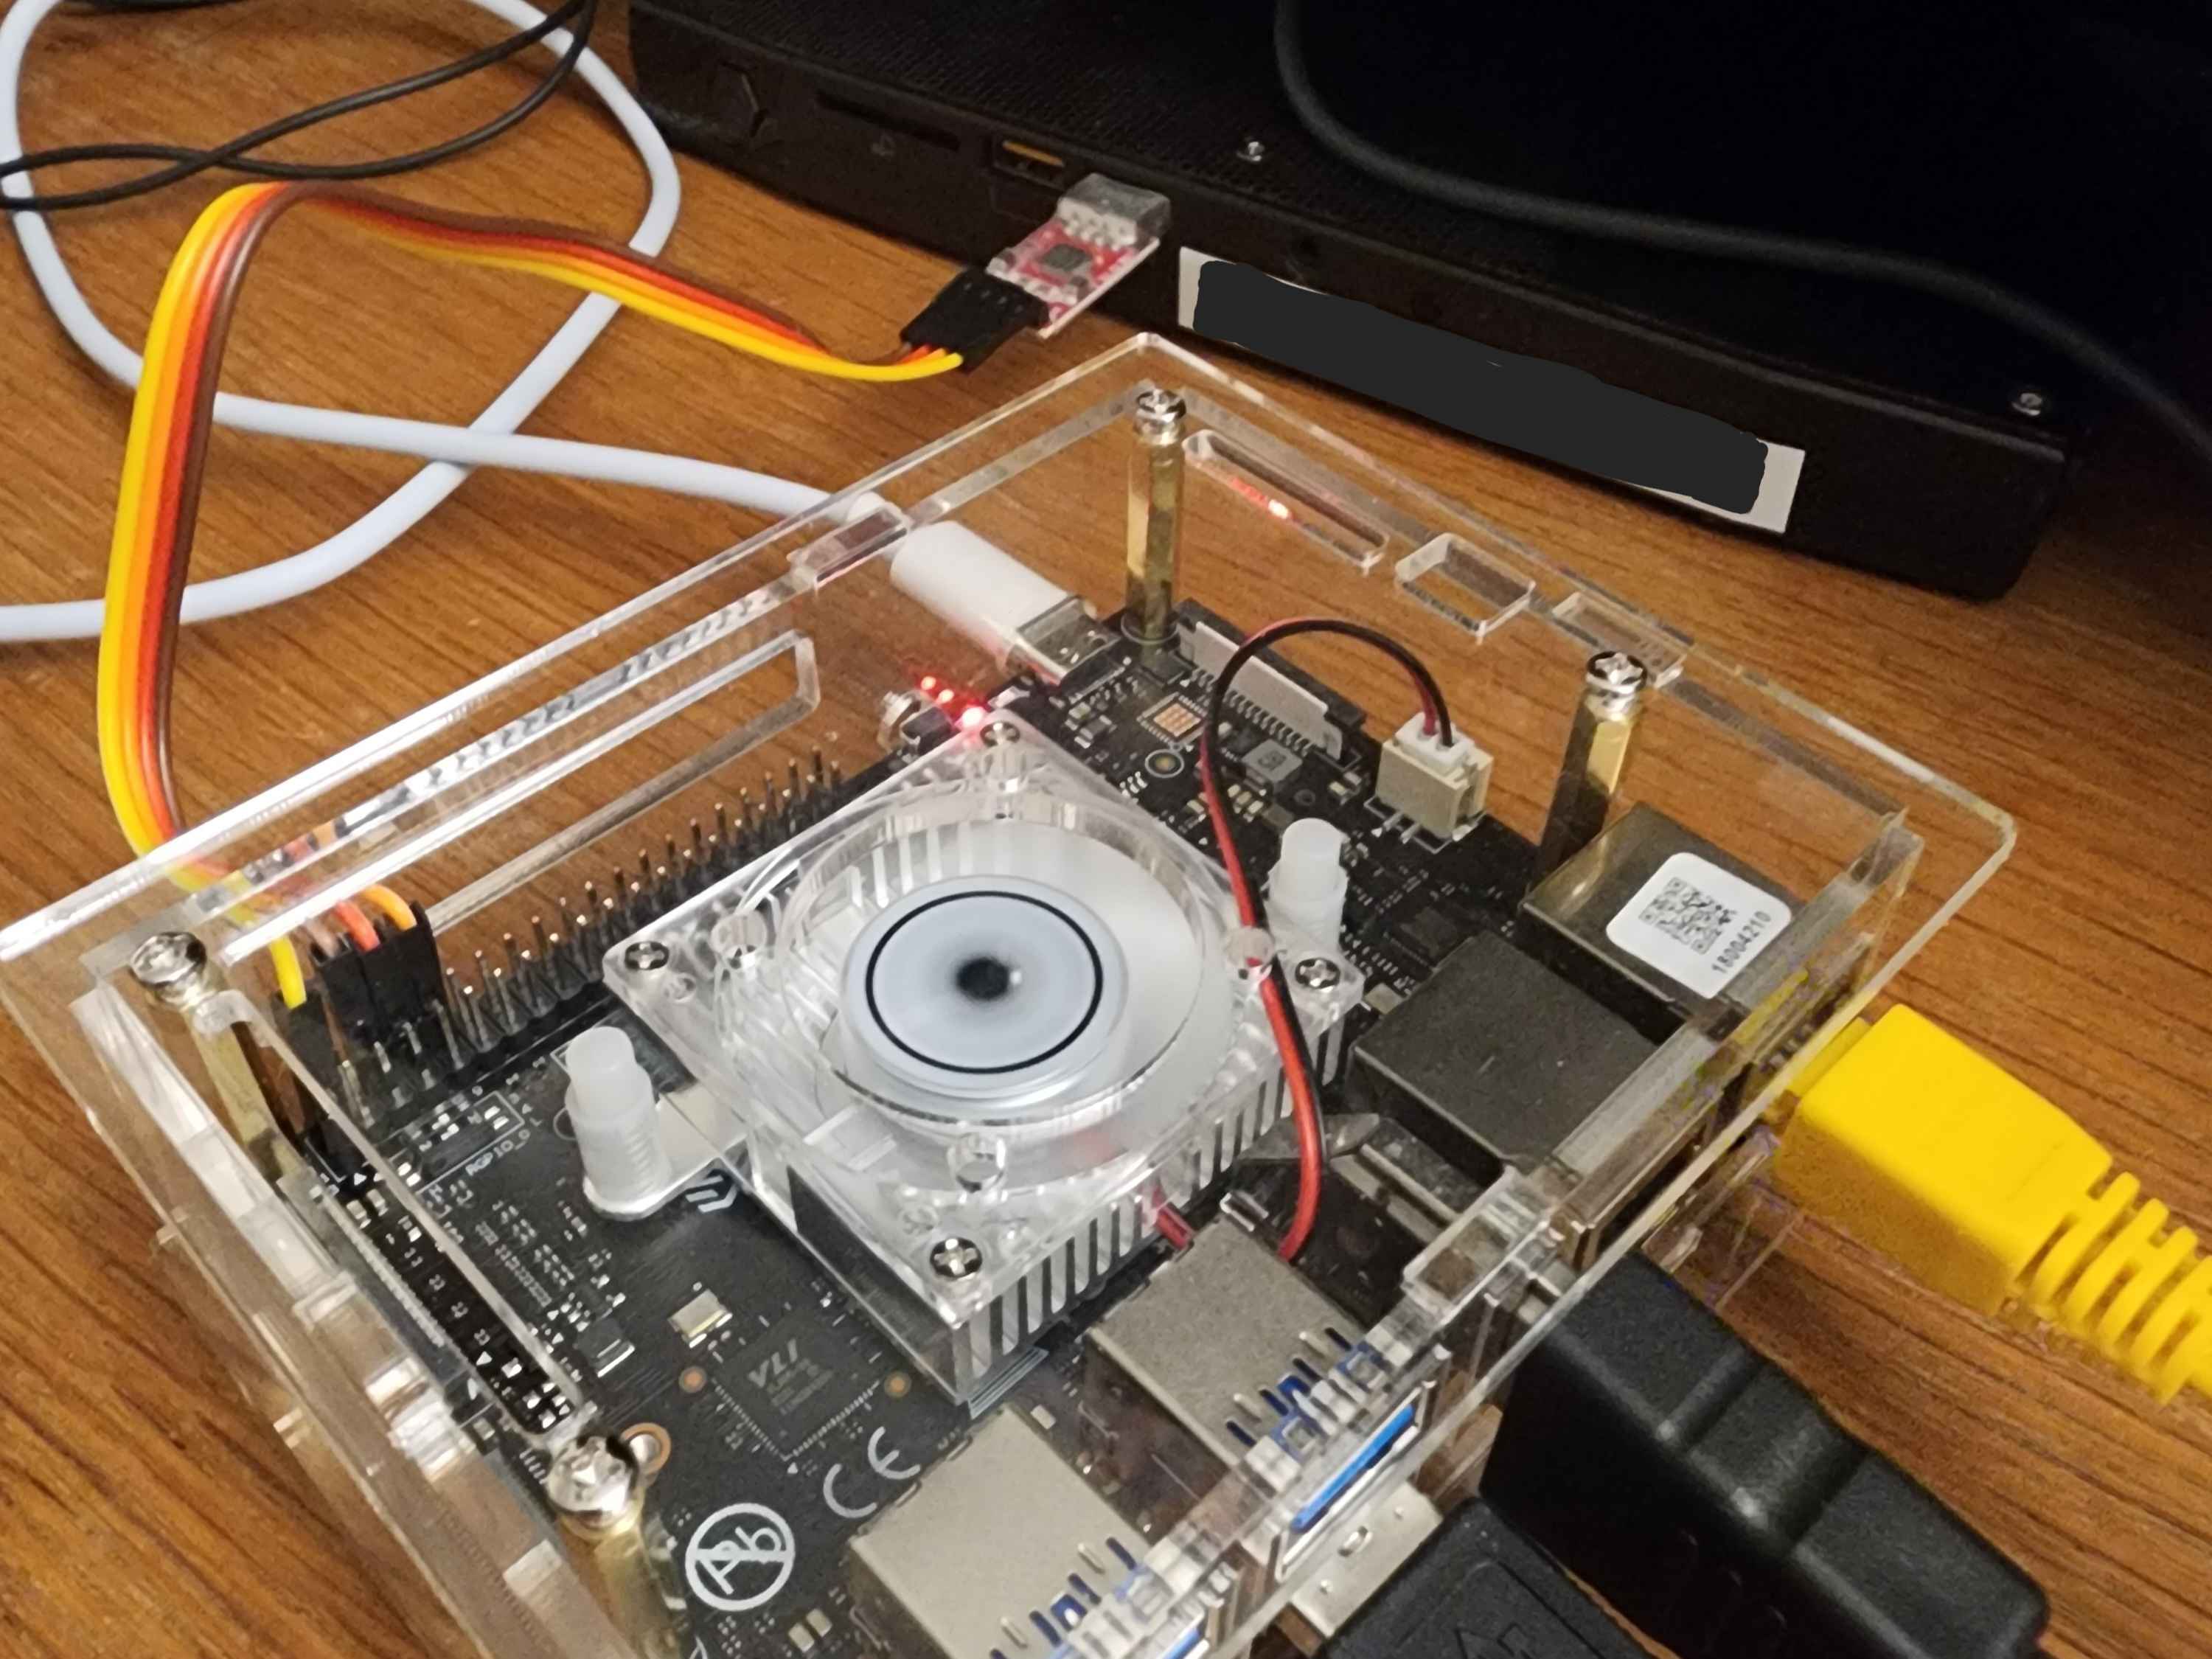
16550-compatible UART in the chip. I went ahead and connected them to
a USB-to-serial adapter I had on hand, and started up minicom to
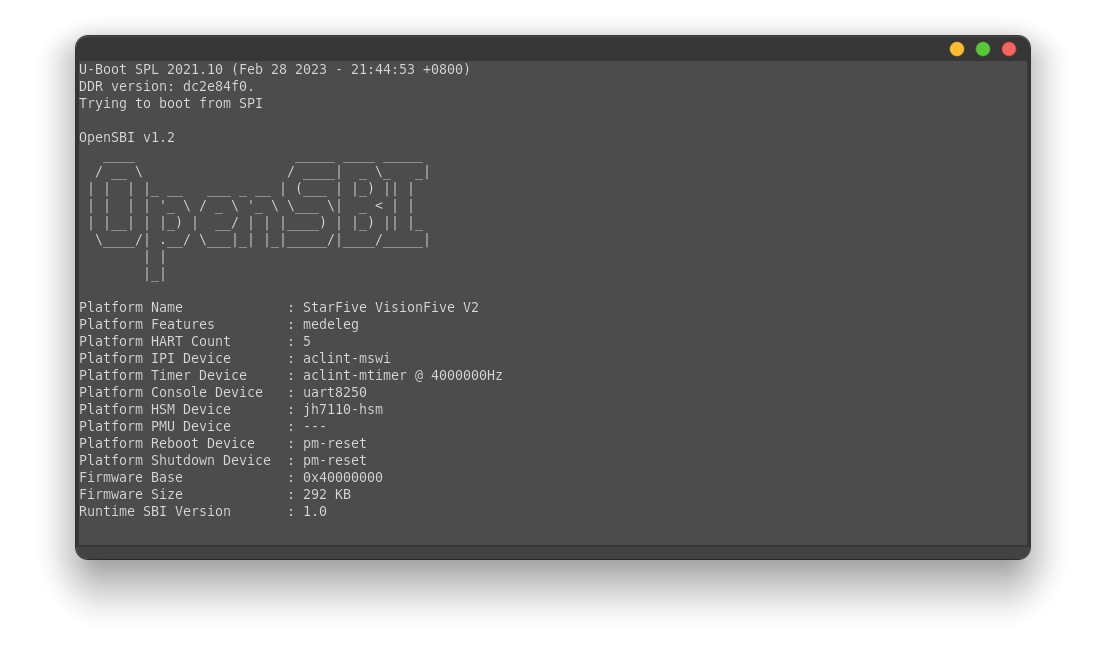
check it out! Like magic, I could see a serial console:


At this point, the boot process fails and U-Boot drops into its command
prompt, since there’s no boot media attached. From here, I can explore
the boot environment. The first thing to do is get the original
bootcmd, which is an environment variable stored in the embedded
bootloader EEPROM that tells U-Boot what do do when it’s done with it’s
initializations. On this particular board, it’s
run load_vf2_env;run importbootenv;run load_distro_uenv;run boot2;run distro_bootcmd.
All of these simply invoke other environment variables as commands in
order to search for valid boot media (such as searching the eMMC, SD Card, and SSD for the appropriate files).
Right now, though, I’m looking to replace the boot command, so I’ll save the old one to restore state later and then do some poking around. I don’t have to do much looking, thankfully! A quick web search and some tab-completion in the U-Boot command line revealed exactly what I wanted:
StarFive# help dhcp
dhcp - boot image via network using DHCP/TFTP protocol

Usage:
dhcp [loadAddress] [[hostIPaddr:]bootfilename]
This let me assemble a pretty easy command to run and test to see how
this worked. I set the environment variable ${serverip} to the LAN
address of my dev machine, and re-used the existing ${kernel_addr_r}
variable that already pointed to the address where U-Boot expects the
“kernel” binary to be.
StarFive# dhcp ${kernel_addr_r} ${serverip}:test
ethernet@16030000 Waiting for PHY auto negotiation to complete........ done
BOOTP broadcast 1
BOOTP broadcast 2
DHCP client bound to address YYY.YYY.YYY.YYY (1058 ms)
Using ethernet@16030000 device
TFTP from server XXX.XXX.XXX.XXX; our IP address is YYY.YYY.YYY.YYY
Filename 'test'.
Load address: 0x40200000
Loading: #
         2.9 KiB/s
done
Bytes transferred = 11 (b hex)
StarFive#
Well… that didn’t do what I expected! It seems like the DHCP boot command doesn’t actually do any booting at all. It does seem like it retrieved the test file and placed it in memory, though, let’s do a quick memory inspection and find out:
StarFive# md ${kernel_addr_r}
40200000: 532d4e46 2d455449 000a3131 3082b283  FN-SITE-11.....0
Excellent! The file test on my TFTP server simply contains the server’s
hostname, and that’s exactly what was downloaded and placed into memory.
Next, I’ll make a proof-of-concept with an actual executable. To keep it absolutely, incredibly brain-dead simple, I’ll hand-write some position-independent code that writes a string to the serial output, and compile it as a flat binary — none of that fancy ELF nonsense!
# boot.s
.section .text
.global _start

_start:
    # Address of memory-mapped UART output.
    li a1, 0x10000000

    # Load each character of the string,
    # "Strike the Earth!\0"
    # and write it out to the UART address.
    li a2, 'S'
    sb a2, 0(a1)

    li a2, 't'
    sb a2, 0(a1)

    # and so on...

1:
    # Hang forever.
    wfi
    j 1b
$ clang -target riscv64-unknown-elf -march=rv64gc -Wall -nostdlib -mno-relax -fPIC -fPIE -c boot.s
$ llvm-objcopy -target riscv64-unknown-elf -O binary -j .text mvp-binary.o boot.bin
$ objdump -D -b binary -mriscv boot.bin

boot.bin:     file format binary


Disassembly of section .data:

0000000000000000 <.data>:
   0:   100005b7                lui     a1,0x10000
   4:   05300613                li      a2,83
   8:   00c58023                sb      a2,0(a1) # 0x10000000
   c:   07400613                li      a2,116
  10:   00c58023                sb      a2,0(a1)
  14:   07200613                li      a2,114
  18:   00c58023                sb      a2,0(a1)
  1c:   06900613                li      a2,105
  20:   00c58023                sb      a2,0(a1)
  24:   06b00613                li      a2,107
  28:   00c58023                sb      a2,0(a1)
  # - snip -
  8c:   10500073                wfi
  90:   bff5                    j       0x8c
Note the last instruction: j 0x8c. That doesn’t seem relative,
does it? In this case, objdump is actually being a bit misleading
with its output. Disassembling the machine code
bff5 reveals it’s not actually a jump to an absolute address, but
instead a compressed extension instruction
that evaluates to c.j -4. That is, a compressed jump four bytes backwards.
The above creates a totally naked, bare binary that contains only the instructions in sequence, with no metadata whatsoever. I’ll copy it to
a pre-determined boot file, 5v2.boot, and then try and boot from it:
StarFive# dhcp ${kernel_addr_r} ${serverip}:5v2.boot
ethernet@16030000 Waiting for PHY auto negotiation to complete........ done
BOOTP broadcast 1
BOOTP broadcast 2
DHCP client bound to address YYY.YYY.YYY.YYY (1058 ms)
Using ethernet@16030000 device
TFTP from server XXX.XXX.XXX.XXX; our IP address is YYY.YYY.YYY.YYY
Filename '5v2.boot'.
Load address: 0x40200000
Loading: #
         17.6 KiB/s
done
Bytes transferred = 146 (92 hex)
StarFive# go ${kernel_addr_r}
## Starting application at 0x40200000 ...
Strike the Earth!
And just like that, I’ve got arbitrary code execution over the network!
Now I don’t have to bother swapping out boot media - a single file copy
to my TFTP root will suffice! Now all that’s left to do is make it
permanent by writing the new bootcmd to the EEPROM:
StarFive# env set serverip XXX.XXX.XXX.XXX
StarFive# env set bootcmd "dhcp ${kernel_addr_r} ${serverip}:5v2.boot; go ${kernel_addr_r}"
StarFive# env save
Saving Environment to SPIFlash... Erasing SPI flash...Writing to SPI flash...done
OK
Of course, there are still improvements to be made — for example, it would be helpful to pass some device information to the boot code, such as a device tree. But, simply proving that it’s possible is good enough for now. With that, this little board has earned a spot on my desk, even if it does still have a good bit left to prove. In the coming weeks I’ll be porting a lot of my software off of QEMU to run on this board… or ideally, shoring up my initialization code to make it all work regardless of the machine it’s running on! Stay tuned for more.
~ Monty